Thursday, 4 June 2009

Ken - Marbling


Hello,

I saw some of your online videos and was deeply impressed.
I am working on a reception counter, and I was wondering
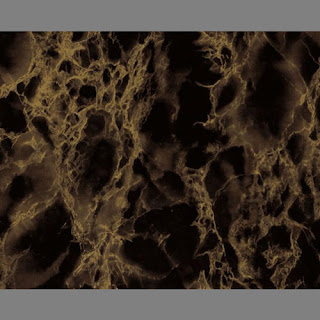
how I would go about doing a gold marble with kind of a 3D
effect as shown in the attachment.  I really really need your
help.

Thank you so much,
Ken

Ken
 
You don't give me any idea of the level of skills you have.
 
The photo you have sent is typical of marble, whether it's real or painted, it has that translucent, you can see just so far into or below the surface of the material. You call it a 3D effect.
 
Whatever marble, whatever colour you want to create to be a marble effect it must have a '3D effect'.
We're lucky, the sample has a dark background. Dark colours tend to recede where light colours will advance.
 
If your brief is to copy a particular piece of marble then first find the darkest colour in the sample and paint the background with it.
Find the lightest and that is your final veining colour.
 
Mix a small amount of the lightest colour with the darkest and create a cloud effect, some cloud shapes with hard edges some without. Parts of the clouds must look like they are disappearing into the background. Create a heavy vein on top of the clouding with a colour lighter than the clouding. Create a second vein lighter and sharper than the last and finally, with the lightest colour and only on the last vein a sharp small vein.
 
If it is going on a reception counter then the finish will need protecting.
 
Hope this helps
Fred

Thank you for your help!

As you probably have noticed, I am a beginner.  I just started practicing faux a couple of months ago.  I drew in some of the clouds but I am having a lot of trouble with the veining.  I am working with water based paint and it seems really difficult to do the veining.  Maybe I just need a lot of practice. 

Thank you,
Ken 

Ken
It is difficult with oil based but bloody difficult with water based.
Are you using acrylic tube colours? or ready mixed. It is best I think to
mix your own.
Try and experiment with tube colour and glycerine or KY jelly. Use a pure
sable or kolinsky hair number 4 or 6, depending on the size of vein. Roll
the brush between the thumb and forefinger at the same time moving over the
surface.
If this all sounds a bit confusing then give us a call back.
Fred 

Justine - Blending

Hi my name is justine i hope you dont mind me getting in touch, i happened to come across you on a web site as i was looking for painting techniques.  I need to blend dark green to a lighter green and then to  a yellow at the top and i have no idea how to do this.  My children are Ben 10 mad and want their rooms decorated, these are the colours and rather than have one wall a colour and so on i thought about blending the colours up the walls from dark green to yellow. 
I hope you dont mind but i need help and dont want to make a mess of it.
Yours a desperate mother in need of decorating tips
Justine

Justine
 
This is a technique from years past but created in then in oil paint.
The process was very messy, high in solvents, difficult to clean up after and when done a fire hazard - the good old days.
It can now be achieved in water based products, but it can be a bit more difficult.
I don't know how your skills are or if you have the tools.
Anyway here we go...........
 
TOOLS
Brushes to apply the water based paint- 2"and 4" or a flat wall brush.
Buckets or plastic paint kettles to mix the paint.
Sponges and clothes.
Hogs hair stippling brushes two 6" x 4" or as big as you can get.
Dust sheets.
Tools to prepare the walls if necessary.
 
MATERIALS
Acrylic eggshell for a base colour of your choice.
Clear acrylic scumble.
Acrylic tube colours or stainers of your choice.
Materials to prepare the walls if necessary.
 
METHOD
I would suggest you create this effect in panels on the wall, not the full wall itself, it can be a daunting task.
Apply the base colour, without any brush marks if you can or roller it to create an even roller texture.
Practice this first, be prepared to paint it over if you make a mistake, mix the scumble with the tube colour to the strength you want. Check how much tube colour to scumble then if it dries too quick you can add more scumble.
 
Apply the lower colour, say green, first to about one third the way up, apply the top colour say yellow to the top third. Mix the bottom and the top colour in equal amount and apply this to the middle third.
 
Before you start charge the stippler with some colour, so as it does not pull the colour off the wall. Work along the bottom in a straight line and then back along the same line but one half the way up the first stipple. Do this and work your way into the mixed colour in the middle third. Then with a clean stippler do the same from the top down. Do not turn the stippler round, keep it going in the same way with the same edge going in the same direction. Stipple into the centre to give a gradual change of colour, no lines or a jump from one colour to the next.
 
Do not start with too strong a colour use colour that have been slightly neutralised and don't put the colour on too heavy.
 
Hope this helps
Fred

Jason - Marbled Slate Fire Surround

Hi Fred, please help.

We have a huge slate marble effect fire surround and it really 
doesn't look good. It over powers quite a small room. I love original 
features but feel I have to do something to make the surround more 
attractive.

Can I get rid of the marble effect with chemicals or should I use a 
specialist paint as I would like it to be a simple feature of the 
slate. I can paint it white as a last resort but feel this is a step 
to far although I like the look. Please help.

Many thanks
Jason

Jason
 
First take pictures of what is left of the marble effect on the slate.
The effect has been produced with oil paint and if it has started to flake or peel off then the only action is to remove all of it and start afresh.
I am presuming the effect has been created in panels and can be reproduced in the style.
To remove the existing work, and so as not to damage the easily damaged slate, do not use scrapers or solvents.
Rub the surface down with wet or dry abrasive paper.
This is the same paper that car body repairers use when spraying car bodywork.
Use a 240 grade to start and finish with a 320 or even a 400 grade and use plenty of water so as not to scratch the surface.
Once this is done and the surface clean and smooth redecoration can commence.
Apply several thin coats of oil based eggshell black and when dry marble the panels as they were before, or if you are not up to it, get in touch with a local decorator to do it for you.
Or, you can paint the surround in what ever colour you wish, perhaps picking out the panels in different colours of your choice.
Hope this helps in some way,
 
Yours
Fred.